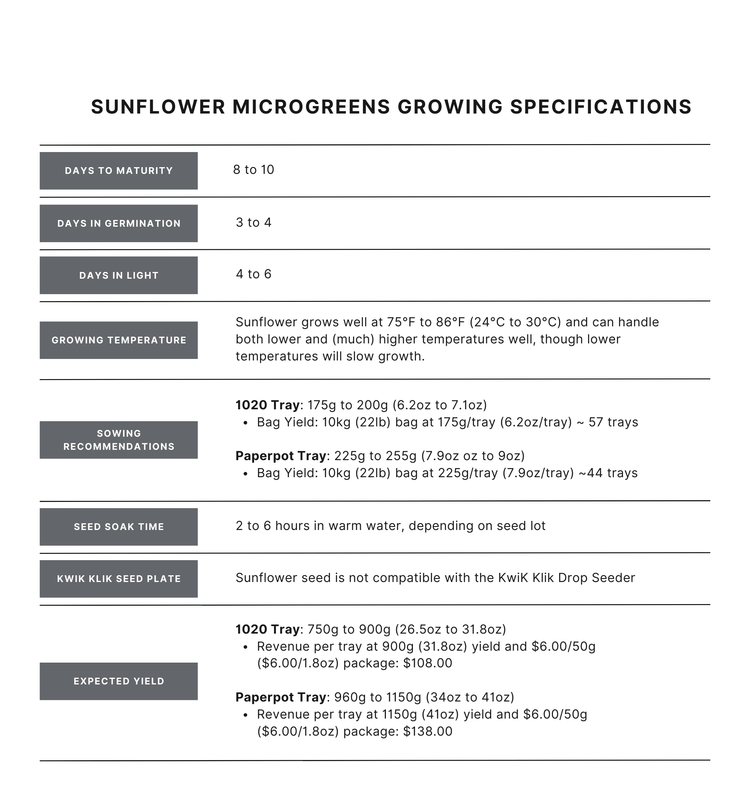
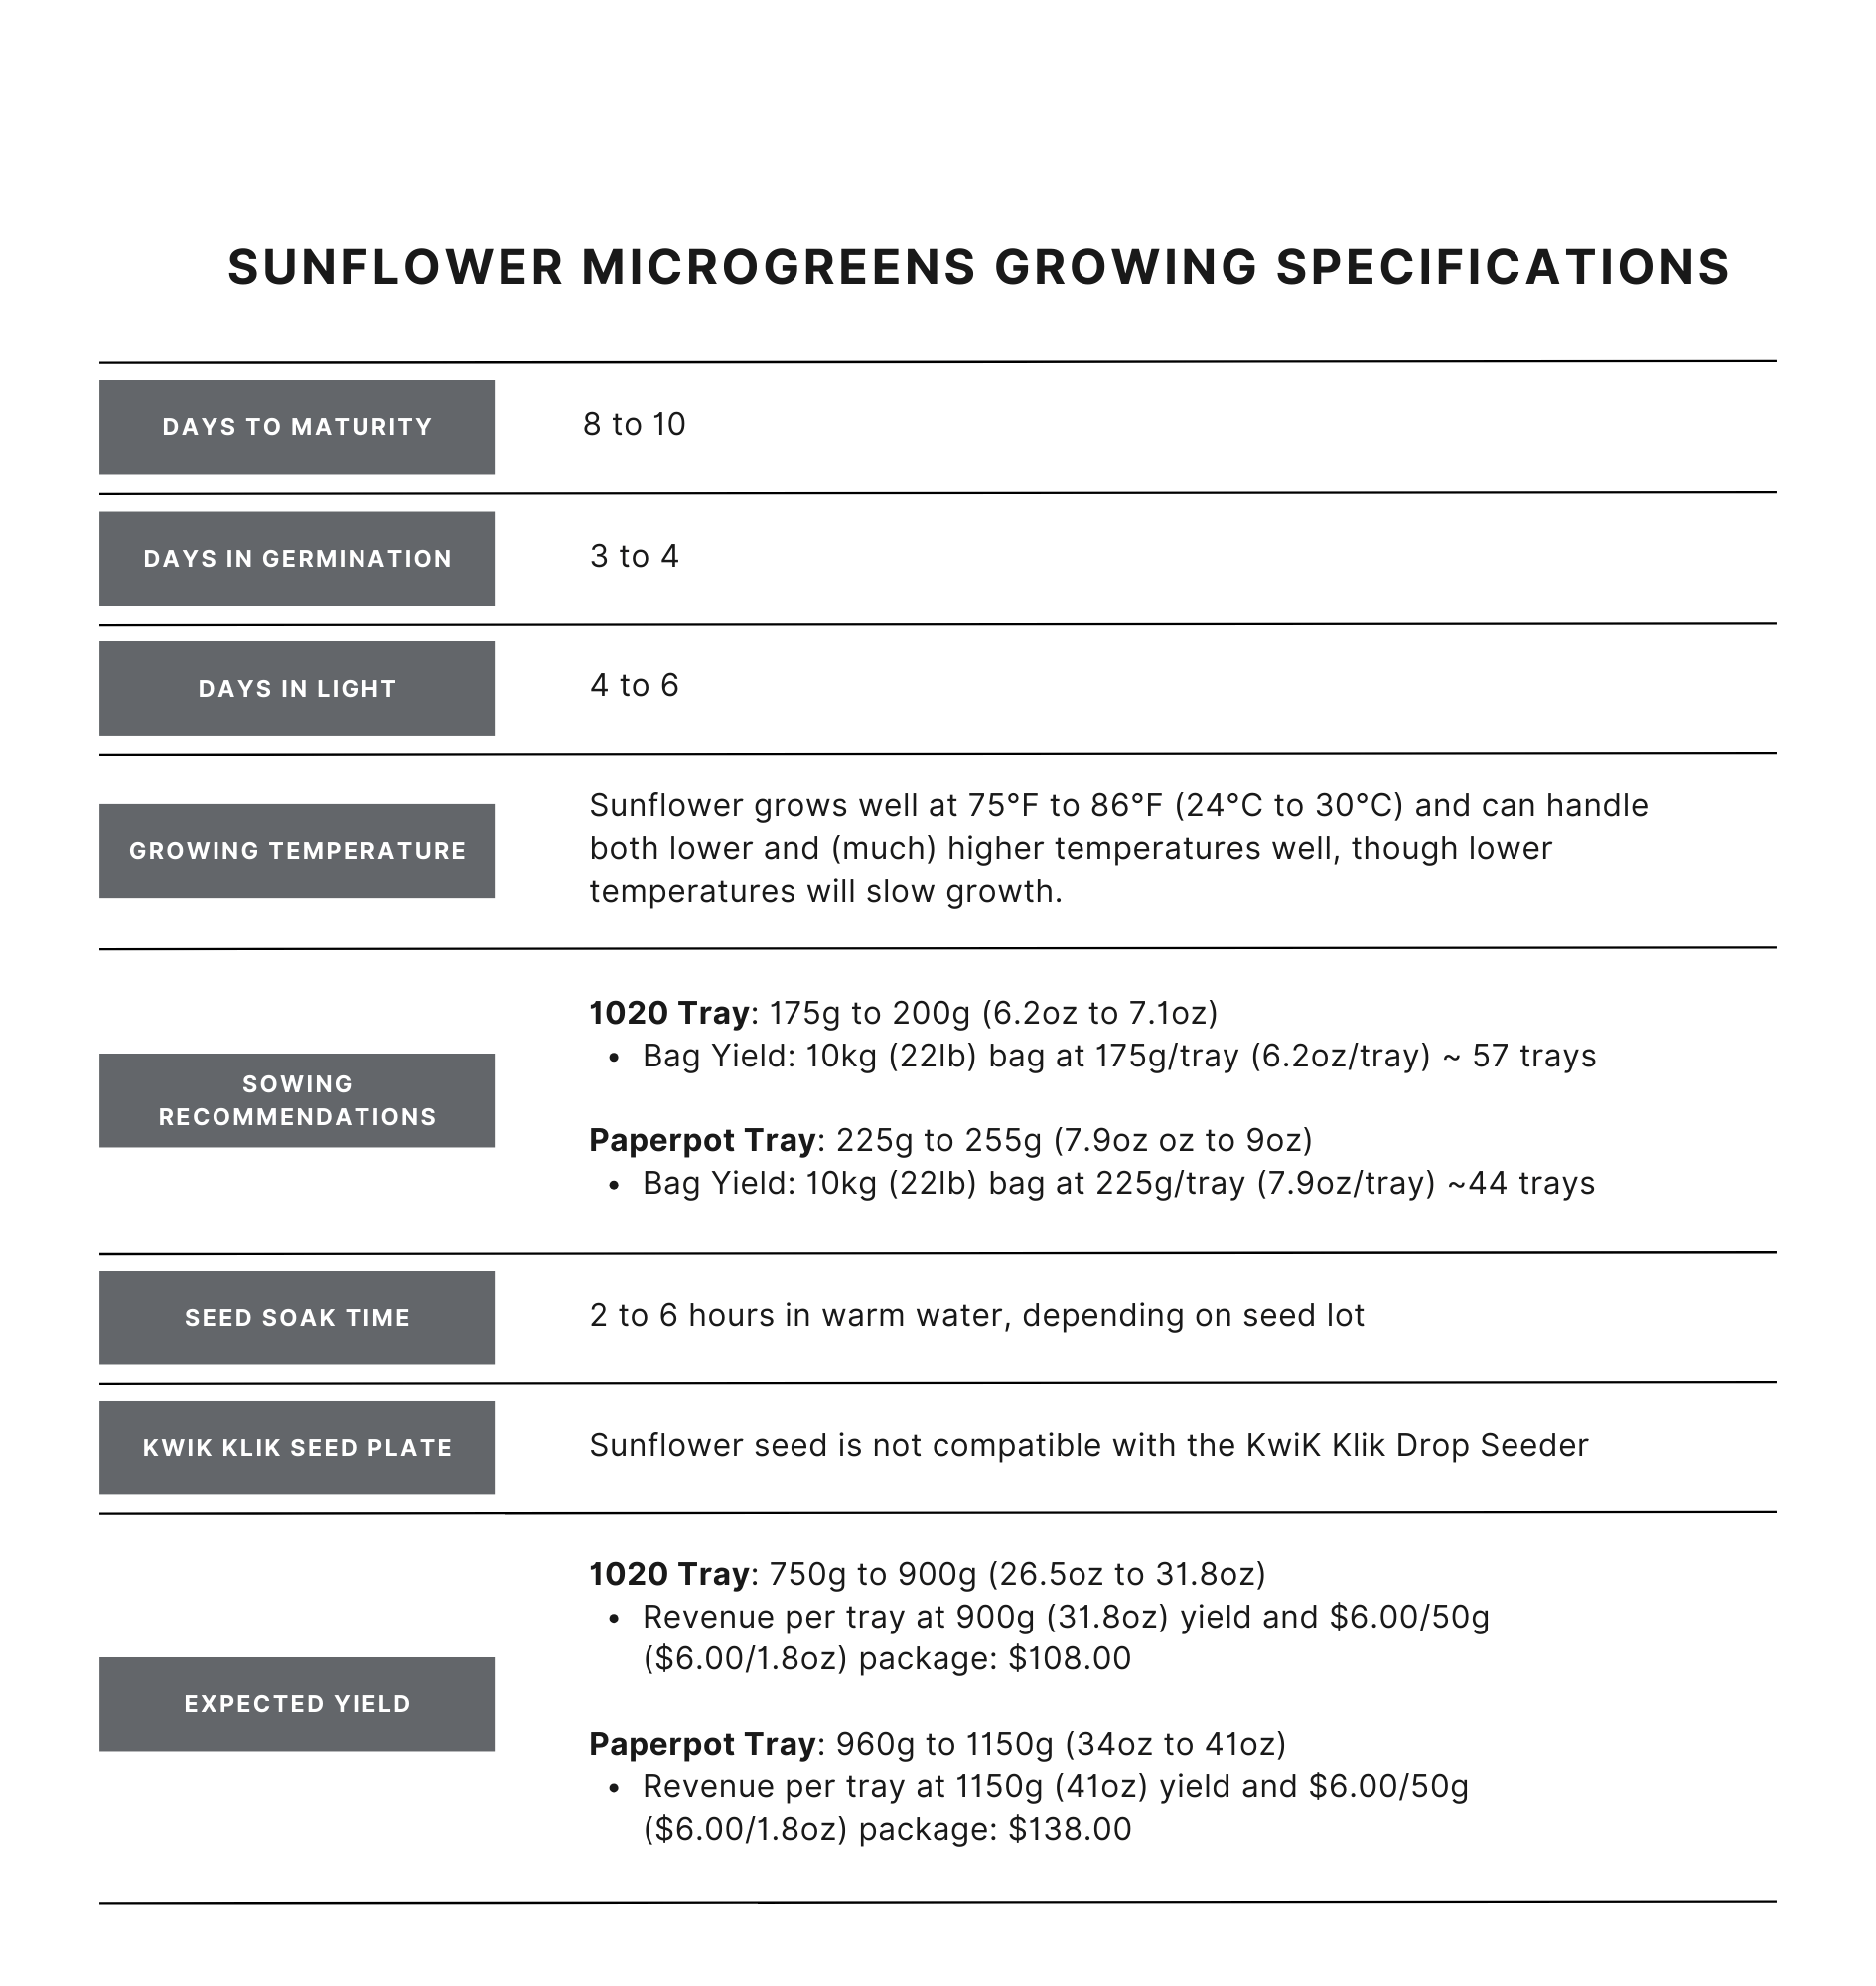
Black Oil Sunflower Microgreen Seed

Regular price
$155.00
Regular price
Sale price
$155.00
AT A GLANCE
  • A must-grow crop for all microgreens operations
  • High-yielding, high return on an eight to ten-day cycle
  • Nutty flavor with a firm texture
  • Great in a microgreens mix or on its own
  • Certified USDA Organic seed
  • Non-GMO
  • Pathogen Tested
  • All seeds are tested to ensure they meet or exceed industry-standard germination rates. 
Bag Size
FREE SHIPPING OVER $100
GMO-FREE
CERTIFIED ORGANIC
PATHOGEN FREE

SUNFLOWER MICROGREENS: DEEP DIVE

Sunflower microgreens, also called sunflower shoots or sunnies, are one of the most popular microgreens crops thanks to their nutty flavor, firm texture, and high yields. But they can be a challenge to grow due to their temperature sensitivity, difficulty in removing hulls, and variability in seed lot quality.

Sunnies are a unique microgreens crop in that they do well in hot conditions. They also have a tough hull that must be removed before packaging, which can add extra steps to your harvest.

Microgreen Soil

Like most microgreens, sunflower benefits from a well-drained, nutritious soil consisting of:

  • Peat or coir for rooting and holding water (75%)
  • Perlite or vermiculite for drainage and aeration (20%)
  • Small amount of high-quality compost for nutrition (5%)
  • Lime to neutralize pH

Many sources state that microgreens do not need nutrients to grow as they have “all the nutrients they need already in the seed”. Our experience is that microgreens grow better with additional soil nutrients, which can be provided with a small amount of compost in your soil mix. Good-quality compost also adds microbial life which can help reduce crop disease. However, too much compost, especially nutrient-rich compost like worm castings, can result in surface mold and reduced water uptake due to nutrient salt content.

Sanitizing Microgreen Seeds

Sanitizing your sunflower seed helps reduce the likelihood of human pathogens in your crop. Zerotol is a peracetic-acid-based sanitizer which is approved for organic use in Canada and the United States.

Sunflower seed should be sanitized using the immersion method, where the seed is soaked in sanitizer before sowing.

Seed Soaking

Soaking in water induces germination in large seeds like sunflowers. Rinse seeds well before soaking to remove any loose debris on the seed. Sunflower has a thick hull around its seed and needs to be soaked long enough to allow the water to fully saturate the hull and reach the seed.

Sunflower seed soak time can vary greatly by seed lot. Start at 2 hours of soak time and then increase soak time as needed to get optimum results. Use very warm water when soaking sunflower seeds, in most cases, you can use the water as hot as it will come out of a typical tap.

Sowing Microgreen Seed

Sow sunflower seeds using the “dump and spread” method:

  • Measure out the desired volume of wet seed needed to sow a tray
  • Dump the seed in the middle of the tray
  • Spread the seed evenly around the tray using your hands

This method can feel clumsy at first, but most growers establish a good technique for quickly and evenly spreading the seed. Even seed distribution is crucial for uniform crop growth. Avoid bare spots and seed clumping.

Germination

The germination stage can set the crop up for success or failure. Poor germination can be difficult to recover from, so optimizing germination conditions is crucial for crop success.

Sunflower shoots germinate well when above room temperature and even quicker at higher temperatures. Use a heat mat or supplementary heater in your germination area to bring up the temperature if desired. Aim for an ambient germination temperature of 75°F to 85°F (25°C to 30°C) or you can go a bit lower if you are using heat mats.

Stacking Sowed Trays

Sunflower shoots do well when “stacked” during germination, where trays are stacked one on top of the other.

For stacking sunnies:

  • Stack to a maximum of 3 trays high to prevent toppling
  • Also reduces pressure on the bottom tray
  • Top the stack with an empty tray and a 14-lb concrete paver

The top tray will have slightly taller growth than the bottom tray, but come harvest time they will almost completely even out (see images below).

PRO TIP: If you your sunflower seed lots exhibit uneven growth (some tall and some short shoots at harvest time). Using 2-14 lb pavers during the germination stage can help even out growth - slowing down the faster growing shoots.

Uncovering Sunflower Microgreens

Sunflower shoots should be removed from the germination stage when the shoots are about one-inch tall and clearly pushing up the cover tray on top of it.

Water sunnies thoroughly from above when removing them from the germination stage and moving them to the light.

Lighting

Sunflower shoots thrive in 14 to 16 hours of light at 5000K to 6500K, or in natural light. If using LED or fluorescent lights, keep them close enough to the crop to prevent stretching. How close will depend on the intensity of your lights.

Online information shows a wide range of optimum PPFD values for microgreens production, ranging from 50 to 400 (Liu et al., 2022; MechaTronix, 2023) We have had success with PPFD values as low as 25.

Overhead Watering

Sunflower shoots are one of the few crops that thrive when watered from above. Overhead watering is best done with a watering wand on the shower setting. Try to find a wand with flow control so you can lighten the shower if you have high water pressure which will reduce the likelihood of knocking the crop over during water.

If the soil is very dry, give the crop several light passes to allow the soil to rehydrate and avoid runoff. Dry soil becomes hydrophobic and will repel water or cause it to run right through (or over) the soil.

Bottom Watering

Many growers like to water their crops using the “flood” method, allowing the soil to absorb water from below instead of from above. This method keeps the crop dry, which can reduce disease pressure and make for easier harvesting. Place a solid tray below your growing tray and fill that solid tray with water. How much water you add will depend on how dry the crop is and takes some time to master. Do not overwater as waterlogged (saturated) soil is at higher risk of contributing to crop disease.

Sunflower shoots use a lot of water so prepare to water them daily in warm conditions and often twice daily in hot conditions. They can be watered from above with a gentle shower, or from below using the “flood” method. Growers report that watering from above can help loosen and remove hulls. Sunnies recover well from dry soil conditions and can rebound from wilting in three to six hours after a good watering.

PRO TIP: Holding back water can help slow down sunflower shoot crop growth if it is ahead of schedule. Water-stressed sunnies can also form a red color in the stem which is appealing to some customers and gives the crop a stronger nutty flavor.

Sunflower Hulls

Sunflower shoots will shed most of their hulls while the crop is growing, but can benefit with some help. After 2 days in the light, start brushing your hand lightly over the top of the crop, on a daily basis, to help dislodge stuck hulls. Removing as many hulls as possible while the crop is growing makes for a quicker and easier harvest.

Harvesting Sunflower Microgreens

The edible leaves of a sunflower shoots are called cotyledons or “seed” leaves - these leaves are literally the seed. True leaves form between and perpendicular to the seed leaves. Sunnies should be harvested between four and five inches tall and before true leaves start to form, which can make the crop bitter and tough.

Place your tray of sunnies on a raised platform so the shoots readily fall into your first water bath (more on this below). Cut the shoots close to the base of the stem with a sharp, good-quality knife. Do not use scissors as this will tear the base of the stem and reduce storage time of the product.

Harvesting Sunflower Microgreens

Sunflower shoots are one of the few microgreens crops that should be washed and cooled after harvest and greatly benefit from a quick double-water bath after harvest to improve storage and remove hulls.

  • The first (smaller) bath should last just a few seconds to cool the crop and remove any soil debris. The crop should be removed from the bath immediately after cutting the tray. This water should be changed regularly to keep the harvested crop clean.
  • The second (larger) bath can be used to remove hulls, which float to the top and can be scooped out, or sink to the bottom. This water can be changed less since most debris will be shed in the first water bath.

PRO TIP: Use a fine-meshed long-handled sieve to remove debris floating in your water baths.

After the water baths, have a drainage tote where the harvested sunnies can be placed while waiting to be spun dry.

Removing Sunflower Hulls

Sunflower seed hulls either sink or float. The ones that sink can be left alone at the bottom of your water bath. The ones that float can be picked out of the water using a small strainer and your hands. Sometimes they can be gathered into the corner of your water bath bin and easily scooped out. Picking hulls quickly is a skill that takes some time to master, but after a while you will be able to spot and remove a floating sunflower hull from ten feet away.

Spin Drying

After the water bath and hull removal, sunnies should be spun dry and refrigerated as quickly as possible. They can be packaged as you go or at a later time.

Packaging

For retail locations, growers typically use a clamshell for optimizing both display and storage. For bulk packaging options, you can use roll bags or reusable containers.

Storing Sunflower Microgreens

Like most microgreens crops, radish shoots should be kept dry and stored in a fridge between (2° to 4° C or 25° to 39° F) at all times. Be sure to maintain the cold chain during transport by using coolers with ice or a refrigerated vehicle.

Modern Grower Research

At Modern Grower we are constantly doing microgreens trials to better understand crop growth characteristics in varying conditions. All the data we provide is informed by our research.

Check out our ongoing research here to get a better understanding of the crop.

Frequently Asked Questions

Customer Reviews

Be the first to write a review
0%
(0)
0%
(0)
0%
(0)
0%
(0)
0%
(0)